
 |
| This is not a shirt I made. I just liked it. So I had to attempt my own. |
Since I'm me, and I'm not happy unless I've got some random craft project in the works, I decided to make tie-dyed tee shirts for all of us.
I spotted these on the DIS boards. There are a million pictures posted over there, some more successful than other, and lots of instructions and tips and hints.
I had to give it a shot.
One of the first things I noted from the boards was that the tie-dye kits you can buy at your local craft store aren't great. They say there's enough dye for 15 shirts or something like that but people were reporting that they were only getting 3 adult tee shirts out of the kit. It's cool that you can buy the kit with a coupon for 40% off but I would have to buy five or so kits because I announced on Facebook that I was doing this and my sister asked if I'd make shirts for her family and one of my friends asked if I'd make them for her family so my grand total of shirts needed became a whopping THIRTEEN!!!
DIS people recommended a mail order dye company called Dharma Trading Company for their high quality supplies. I ordered their serious tie-dye kit which comes with:
- three squeeze bottles
- Lemon Yellow dye
- Fuchsia dye
- Turquoise dye
- 1 lb. Soda Ash fixative
- 1 lb. Urea
- A small bottle of Professional Textile Detergent
- 50 rubber bands
- 1 pair rubber gloves
- 1 dust mask
- Instructions
I was a little intimidated by the powders and all of the warnings that these things are hardcore chemicals and "make sure you mix in a well-ventilated area" and "these substances are known to the State of California to cause cancer" yadda, yadda, yadda. My box arrived yesterday and I couldn't wait to get to mixing.
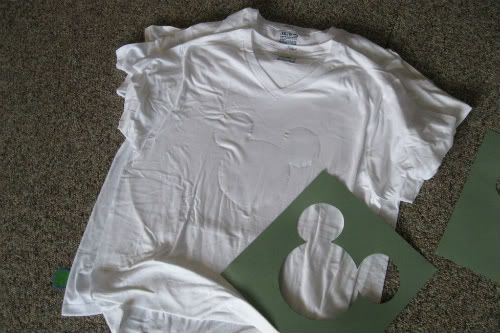
Start with 100% cotton tee shirts. You can use the 50-50 poly cotton ones but according to the Dharma people and the DIS Board people, you won't get colors that are as vibrant. We all lucked out because Old Navy had a sale last week where their cotton tee shirts were $4. That's a pretty good deal. I reminded everyone to buy a size larger than they normally like because cotton shrinks. Above you can see shirts on my carpet. I used my Cricut to cut a large Mickey head and I used it to trace a head onto each shirt.
I don't have a photo of the next step but it's pretty easy. Get some dental floss. Yes, dental floss. It doesn't matter if it's mint or cinnamon flavored (that might have actually made it easier since those are colored) but it seems to be better if you use the waxed kind. Additionally, don't use the flat ribbon kind, it will be hard to pull it through the fabric. You want to sew a basting stitch all the way around your Mickey head. Just a simple in-and-out stitch outside the outline you've drawn. I tried to keep my stitches about a quarter inch outside of the outline. Leave a tail hanging at the end where you start sewing, you'll need it later.
I was in a little bit of a hurry to get to dyeing so I tied the floss in a knot and washed all of the shirts in warm water with detergent but no fabric softener. You need to get the sizing and stuff they put in the shirts to make them look pretty in the store out of the fabric. You want the fabric to be clean. Dharma says to test and make sure that they'll absorb liquid dropped on them, rather than beading up on the surface. You need the dye to sink in!
When the shirts were done in the wash, it's time to wrap them up! I covered my kitchen table with a plastic trash bag that I sliced open. I taped it down on the corners so it wouldn't shift while I was working.
Take your damp shirt and put your hand up inside it to separate front from back. Put your hand under the Mickey and pull both ends of the floss so that the Mickey gets all puckered. I used my fingers from behind to push out the shape so the Mickey was all on top and I could sort of see the Mickey shape. Then I wrapped the excess floss around the puckered fabric, just a teeny bit below my stitches. Then I rubber banded tightly over the floss. This is supposed to keep a white outline around your Mickey.
Next it's on to the Danish Phase. Danish, like the pastry, not like a person from Denmark. I laid the tee shirt flat on my plastic covered table. The shirt won't lat totally flat with the bunched up Mickey but I tried to make it as flat as I could and arranged the pleats and folds into a pleasant and even pattern (so all the bunches weren't on one side or too uneven in size) and then I twisted.
 |
| My banded up danishes |
Next, the shirts get a bath in a mixture of Soda Ash and water. Soda ash came in my kit but it's essentially the same stuff they sell in your grocery store's laundry aisle in a big yellow box from Arm and Hammer called Washing Soda. You've probably never noticed it, but I swear, it's there. You add a cup of soda ash/washing soda per gallon of warm water. Mix to dissolve and plunk in your danish and let them soak for 15 minutes.
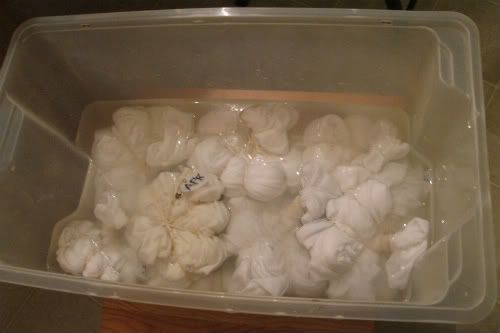 |
| Awww! Look! They're going for a swim! |
That soda ash stuff is mildly caustic. Wear your gloves and don't spill it on your furniture.
Why bother with this phase? Here's what Dharma says:
In English: it makes the dye stick to the shirt better at room temperature. Even Englisher: it makes it more prettier.The Soda Ash pre-soak raises the pH level of the garment or fabric to approximately 10.5. Raising the pH level of the solution that the fabric or garment is soaked in raises the level of negative hydrogen ions in the dyeing environment. The chemical bonding process uses these ions in the reaction. Pre-soaking in Soda Ash fixer solution is what allows the fiber reactive dyes to work at room temperature.
While the shirts swim, you get to mix dyes. Here's the part where I was really confused and a little disappointed in Dharma. I wanted a one sheet set of directions on how to mix the dye. All in one place. It seemed like each sheet with the dyes and in my kits referred me to some other place for a different part of the directions. I'm going to simplify it all here.
The dye mixing goes like this:
First, put a little hot water in a Pyrex measuring cup. Like maybe 1/4 cup and add 1 tablespoon of the UREA pellets and stir until they dissolve.
Next, add your dye powder. Dharma has a system based on asterisks that tells you how much dye powder you need to add to get the right pigment. The bags that came with my kit were labelled Lemon Yellow*, Fuschia* and Turquoise*. One asterisk means 4 teaspoons of powder. You add that to the UREA water- they call it pasting it up- mixing it into a paste, which helps to avoid lumps. Then add warm (body temperature) water up to the 1 cup line and mix. Use a funnel to pour the dyes into your squirt bottles.
I was also mixing a color they call New Black**, with two asterisks. That means it took 8 teaspoons of dye powder. They also said to add 1 tablespoon of regular salt to the mix for blacks. Apparently black is a tough color to use and get deeply colored in the finished product.
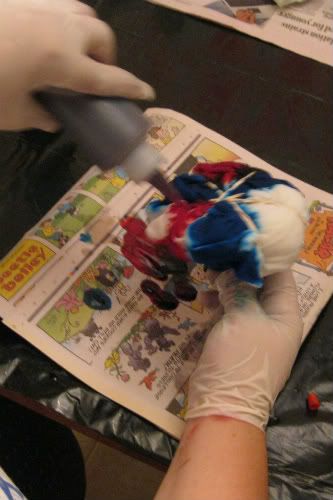
And then I started applying the dye. You tip your danish to the side and start with your Mickey. You've gotta really soak it and make sure the dye seeps down into the cracks and then wrap mickey in a bit of plastic wrap to protect him from the rest of the dyes.
You've got to really soak the fabric, pushing the tip of the squeeze bottle down into the folds of the fabric. I did each shirt over a fresh piece of newspaper because they dripped a little bit.
To get the traditional tie-dye spiral, you alternate colors on the wedges of your danish.
Once you've put all the dye you want to use into your danish, you have to wrap it up in some kind of plastic to keep it moist for 8 to 24 hours. This begins the hardest part of the tie dye process:
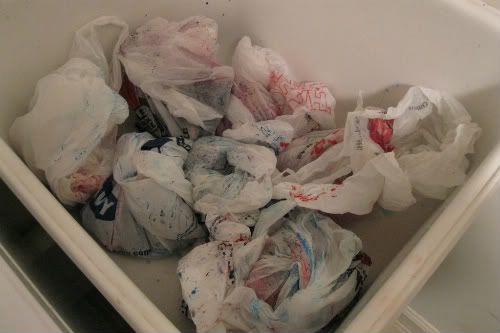
I'm a little nervous. I'd read on the DIS boards that you have to use more dye than you think you need. It's hard to get the dye to sink into all those wrinkles and folds. Mine were DRIPPING. When I put them into the bags, I was worried that my colors were going to pool and leave a big muddy mess on the backs of these shirts.
These shirts that are mostly for other people and I've never done this before. I am going crazy wanting to open one up and see how I did! I finished around 1 am so I'm trying to wait until 1 pm to start rinsing and unwrapping. We're going out to lunch and to find the kids some walking sandals to get me out of the house and out of the way of temptation.
 |
| Prince Charming has a knack for taking photos of me at the most unflattering angle possible. |
The rinse and initial wash is apparently one of the most important steps to avoid "muddy" tie-dyes.
Dharma says to use gloves and rinse the garment while it is still tied under cold running water.
Then I'm supposed to gradually untie it while still rinsing and get as much dye out as possible.
Then the shirts are supposed to immediately be washed with HOT water and this special detergent called Synthrapol or Dharma Professional Textile Detergent, which came in my kit. This special detergent helps get the rest of the excess dye out of the shirts so they won't bleed and run in future washings.
They also warn that before washing, don't let the dyed clothing touch anything!
See the results at Fit to be Tied, Part 2.
Can't wait to see the finished product!!!
ReplyDeleteIf I would have known it was all that work...
ReplyDeleteWaiting to see how they turned out! I made my own, too, for our Disney Cruise and they turned out really great! Nothing like the inspiration picture at the top of this post - lol - but we got a lot of compliments on them!
ReplyDeleteThat is too cool! My boys would loooove this! Your tutorial is so detailed and spot on...i should bookmark this!
ReplyDeleteI've never seen tie-dye like that! Thanks for sharing.
ReplyDeleteThose look pretty fun! I was just in WDW a couple of weeks ago, and did notice a few tie-dye disney-themed shirts around the park. I think it's an incredible idea, and if I had little kids traveling with me, definitely something I would adopt. Plus, it does look cool in the pictures when everyone is matching :) I have some tie dye paint left over from a different project, maybe I'll try making my own tie dye shirt... Does it still count if it's all in pastel colors? :)
ReplyDeleteVery cool! I haven't done tie dying in ages. If I can convince DH to wear tie dye (and we'll see about that, haha!) then maybe this will be a plan for a future Disney trip :)
ReplyDelete